How to Make a Gun Holster
by Robert Fox
Owning a gun and carrying it around could be hard when you don't have a holster. The main three purposes of a gun holster are safety, accessibility, and security. A holster securely holds your weapon and also maintains positive control over it all the time. Apart from that a holster also protects against any mishap due to accidental contact with the trigger. Finally, a holster keeps your firearm accessible to you so you could easily reach for it when you need it quickly in some tough situations.
Contents
Although there are many varieties of holsters available in the market with fantastic designs, styles, materials, and other features. For instance, there could be a hoster worn outside the waistband, inside a waistband, a pocket holster, an ankle holster, or a shoulder holster. The material is nylon, Kydex, molded plastic, neoprene, a sharkskin canvas, and leather and each one of them has its weaknesses and strengths.
Steps to Make a Gun Holster
So in this segment, we will learn how to make an inside the waistband gun holster pattern that you can utilize on any material of your preference. So follow all the steps minutely to make a perfect gun holster for your weapon.
1. Choosing a Piece of Cardboard or a Rigid Folder
For making a gun holster the first step involves choosing the right type of material for the pattern. And the most useful is a piece of cardboard or a rigid folder which is more robust and thicker than paper. Then you have to bend that piece lengthwise in half and draw a straight line.
If you are using a real gun to make a pattern then make sure there are no children and animals around for safety reasons because you will be pointing the gun in different directions to correctly make a pattern.
2. Drawing the Pattern on the Cardboard or a Thick Folder
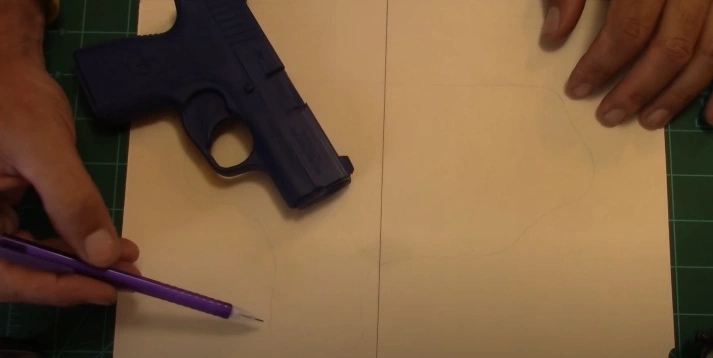
After dividing the piece of cardboard or any other thick folder lengthwise in half you have to put the gun straight on the line in the middle and put it on the table on the right side. Some people put the gun on the left side of the line but it is better if it is on the right side.
Once the gun is laying down on the piece of cardboard on the table then there are three main important things of making a holster you have to keep in mind.
- The first is that you don't want the leather, Kydex, or any other material impeding the magazine release.
- The second thing is that you would want a good distance between the grip of a gun and the part of the holster that is going to cover the grip. This will ensure a good combat grip.
- The third thing is that you want to make sure of the retention of the holster while pulling the gun out of it. You have to make sure that the opening of the holster stays open and it does not fold or collapse on itself.
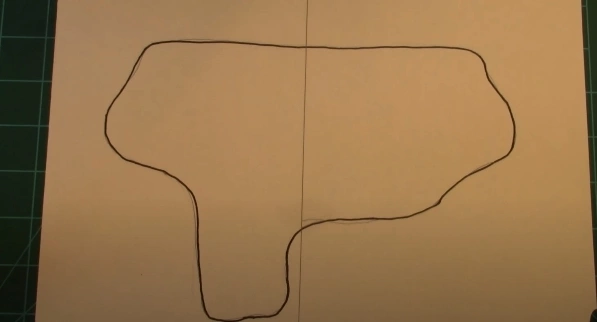
These are some important factors for making a perfect holster for an inside the waistband holster. That being that the next thing to do is draw the pattern. The drawing is trial and error because there are no facts or figures or any exact scientific method to do it. It just needs practice and patience.
You have to go around the gun and draw a pattern. You need to leave a good distance between the grip and cover the trigger. The left side of the cardboard piece is longer than the right because it is going to be folded on the gun.
3. Cut the Pattern
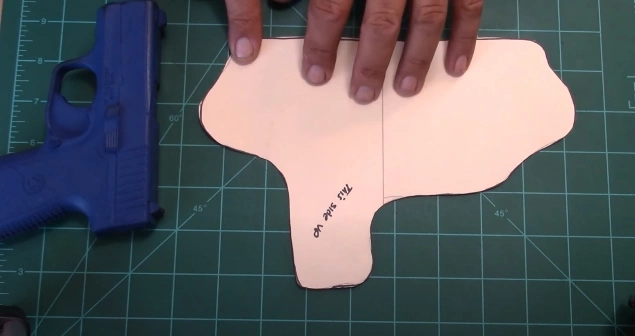
To cut the pattern you have to keep the cuts pretty wide and you don't need any narrow cuts on any corners. Every cut has to be kind of round and avoid any pointy shape. This will ensure that nothings get snagged on. The reason behind the swopping pattern is because a swopping pattern makes sit easy to cut the leather.
If anything is tighter in any corner of the pattern then it becomes nearly impossible to have a good and clean cut. In addition, when you go to sand and use a drum for sanding a tighter corner would not fit inside the radius so it would be great if the pattern cuts are wide.
After cutting the pattern lay it on the top of the weapon and lune up the sweat shield to the top side of the gun and fold it over so you are looking at the back of the holster. You have to make sure everything lines up. And the left side is a bit longer than the right side because you have to sweep it over and have enough leather left to stitch some part of it. If there is no gap or room left the gun won't fit and if there is much left then required you can always cut it afterward.
4. Draw the Outline of the Gun on the Pattern
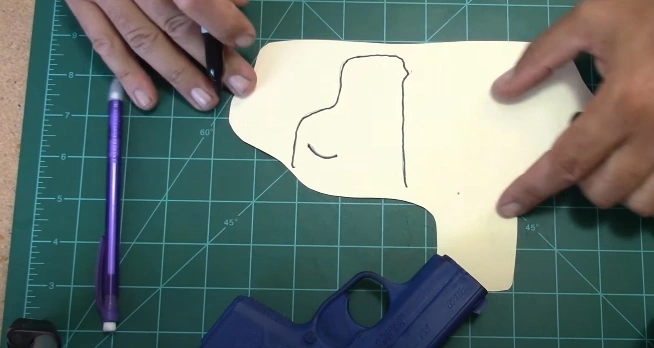
Now you have to figure out where you are going to put a stitch line that goes on the front of the holster. For this, you have to put the gun down with the pattern folded on it. Hold the bottom side of the pattern on the table and let the other side flop.
By carefully holding the gun down you nicely outline the gun on the inside of the cardboard or any tough paper pattern and mark the trigger too and that is all you require. It is a simple step to outline.
Then you have worked out the stitch line and for that, there is a rule of thumb. According to some people to measure the rule of the thumb you have to take half of the distance of the width of a gun. But this rule might result in the stitch line being too close to the gun and the gun doesn't even fit inside the holster.
So the alternative method is to take a ruler and go from ¾ inches of the outline and keep going around the outline by measuring this distance with a pencil or a marker. This is going to be the stitch line but it is within the holster. By turning the pattern you can see where the stitch line is going to be and trace it outside of the holster.
Now double-check everything to ensure that the pattern is wide enough to have a good stitch line and to ensure nothing is impeding the magazine release and the leather you are going to cut should hide the trigger for safety. You should have ample leather at the back of the gun to hide the crown of the barrel.
5. Putting the Belt Clip on the Holster
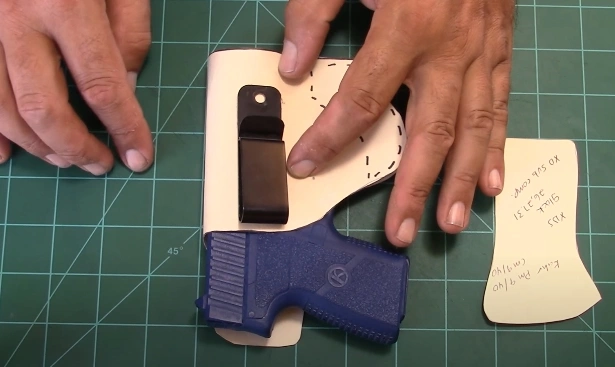
The next this is that you have to work out how to fit a belt clip on the inside the wasteland holster and for that you have to make sure of some certain things. Like you don't want to rivet the inside piece of the leather by putting the clip there because it with scratch the gun. So this is what you are going to do to avoid this.
The impression of the gun you have drawn inside the pattern is visible through the paper and you have to find that spot and put the belt clip and make sure it's going to be directed upon the gun. You don't want the clip to be sliding to the left or the right you need it right on point to be a part of the gun.
So after finding that spot and mark where you are going to put the belt clip. You can easily do this by drawing another impression of the gun and putting the cutting on the outside to correctly figure out where the clip is going to be. Be careful not to mark it close to the stitch lines because you have to avoid any kind of hindrance. Double-check everything and provide enough room between the stitch lines and belt clip spot.
And that is pretty much all that you have to do. After cutting the piece for the belt clip and putting the rivet on it you have the holster.
 |
 |
 |
 |

About Robert Fox
Rob Fox is a former hydro worker who used to teach self defence in Miami for 10 years. He's currently enjoying his retirement, playing cribbage and golf with his buddies, locksmithing and home security in his spare time. Rob is an avid reader, and has even written a few books on the subject of self defence.
Thoughts on "How to Make a Gun Holster"
 |
 |
 |
 |
You can Get FREE Gifts. Furthermore, Free Items here. Disable Ad Blocker to receive them all.
Once done, hit anything below
 |
 |
 |
 |