Nearly 85% of homeowners say window treatments are one of the first things guests notice when stepping into a room — yet hanging curtain rods ranks among the most-postponed weekend projects on most home to-do lists. Learning how to install curtain rods is one of those skills that pays off fast. You'll spend an afternoon on it and enjoy the result for years. Whether you're adding privacy to a bedroom or freshening up a living room window, this guide walks you through every stage clearly. For more window covering projects, browse our complete curtain installation resource collection.
There's a home security angle worth considering here too. Curtains that fully cover your windows at night stop people outside from seeing into your home — your layout, your valuables, your daily routines. That's a real, practical privacy benefit. If you're already thinking about whole-home security from multiple angles, pairing good window coverings with a smart approach to placing your security cameras creates overlapping layers of protection. Curtains won't stop a determined intruder on their own, but they reduce the visibility that puts your home on someone's radar in the first place.
This guide covers the tools you'll need, the right conditions for a DIY installation, a detailed step-by-step walkthrough, best practices for a polished result, care tips, and a quick comparison of common rod types. By the end, you'll have everything you need to pick up a drill and get started.
Contents
Everything You Need Before You Start
Before you pick up a drill, take five minutes to gather your supplies. Running back to the hardware store mid-project breaks your momentum and turns a one-afternoon job into a two-day ordeal. Here's a clear breakdown of what you'll need on hand.
The Basic Tool Kit
Most of these items are already in a basic home toolkit. If you're missing any, they're inexpensive and useful for dozens of other projects around the house.
- Drill — a corded or cordless drill both work fine. Use a 3/32" drill bit for most standard drywall anchors, or follow the size printed on your anchor packaging.
- Level — a small torpedo level (the short, pocket-sized kind) is ideal for confirming your brackets sit at exactly the same height. Even a half-degree tilt becomes obvious once fabric is hanging.
- Tape measure — you'll measure multiple times before drilling once. A 16-foot tape is more than enough for any standard window.
- Pencil — for marking bracket locations directly on the wall. Pencil marks wipe off with a damp cloth; pen or marker marks don't.
- Screwdriver — keep both Phillips head and flathead versions handy, since curtain rod hardware uses both depending on the brand.
- Stud finder — optional but genuinely helpful. Mounting into a wall stud (a vertical wooden beam hidden inside the wall) gives you a much stronger hold than drywall alone.
- Hammer — for tapping plastic wall anchors (small plastic inserts that expand inside drywall to grip the screw) flush with the surface when studs aren't available.
Rod Hardware and Supplies
- Curtain rod — sized for your window width, with extra length for the brackets to sit beyond the frame
- Mounting brackets — typically included with the rod; purchase a center support bracket separately for windows wider than 60 inches
- Wall anchors — essential any time you're not drilling directly into a stud; rated anchors hold far more weight than unrated ones
- Screws — usually included with the bracket hardware; have a spare set ready in case any strip
- Curtains or drapes — have these ready before installation so you can verify coverage, panel length, and total weight before committing to a rod gauge
One practical tip: buy your curtains before you buy the rod. The weight and style of your curtains directly affect which rod diameter (called the gauge) you need. Heavy blackout curtains demand a sturdier rod than lightweight sheers. Getting both right on the same shopping trip prevents a return trip.
When Installation Makes Sense — and When to Hold Off
Curtain rod installation is almost always a DIY-friendly job. But certain situations make it more complicated than expected — and knowing the difference saves you time, money, and wall damage.
Good Conditions for a DIY Job
You're well-positioned to handle this yourself when:
- Your walls are standard drywall — the most common interior wall material in homes built after the 1950s
- You're comfortable with a drill and have used one at least a few times before
- The window is a standard rectangular shape without unusual trim or obstructions
- You're installing on a window under 6 feet wide (a single rod with two brackets handles this easily)
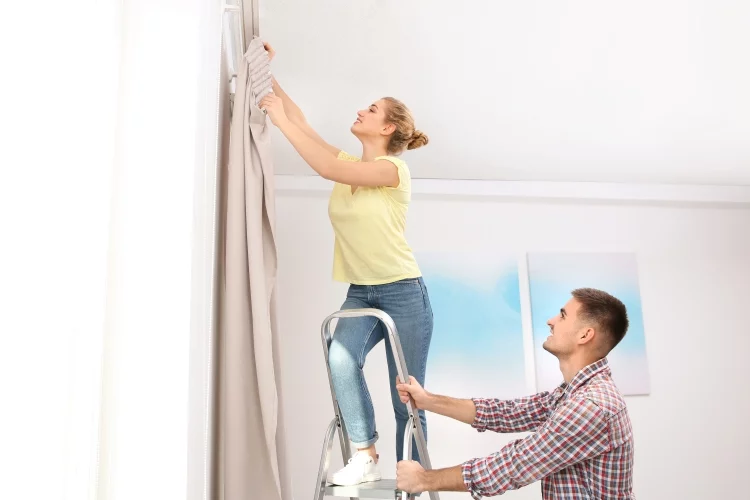
- You have someone available to hold the rod level while you mark and confirm measurements
- Your curtains are light to medium weight — sheers, linen, cotton, or standard polyester blends
When to Call a Professional
Some situations are genuinely worth bringing in outside help. Consider hiring a handyman when:
- Your walls are plaster — older homes built before the mid-1950s often used plaster, which cracks more easily than drywall when drilled
- You need to mount over tile, brick, or concrete, which requires specialty drill bits and anchors
- You're hanging very heavy drapes on a window wider than 8 feet, where improper anchoring could lead to the rod pulling out
- The window sits at an unusual height that requires scaffolding or a tall ladder
- Previous bracket attempts have already damaged the wall, leaving holes that need to be repaired before re-mounting
If you're thinking about bringing in professional help to manage your home more broadly, our guide on hiring a home watch company covers what to look for when trusting a professional with your property.
How to Install Curtain Rods: Step-by-Step Walkthrough
This is the core of the process. Work through each step carefully, especially the measuring phase. A mistake at the beginning is the most common reason people end up re-drilling holes and patching walls.
Step 1 — Measure and Plan
Accurate measurements are what separate a clean installation from one you'll want to redo within a month.
- Decide where to mount — you have two options: on the window frame itself, or on the wall above and to the sides of the window. Wall mounting gives you more flexibility with height and width, and is the more common choice for modern installations.
- Measure window width — for most windows, extend your rod 3–6 inches beyond each side of the window frame. This allows curtains to stack clear of the glass when open, letting in maximum light.
- Determine mounting height — the standard rule is 4–6 inches above the window frame, but many designers push this higher. According to Wikipedia's overview of window treatments, high-mounted rods visually elongate a room by drawing the eye upward. For maximum visual impact, mount as close to the ceiling as practical.
- Mark your bracket positions — using your tape measure, mark where the left and right brackets will sit. Hold your level across both marks and confirm they're perfectly even before moving on.
- Check for studs — run your stud finder along the wall near your bracket marks. Studs are typically spaced 16 inches apart. If one falls close to a bracket position, plan to hit it. If not, use rated wall anchors.
Step 2 — Mark Your Bracket Positions and Drill
- Hold each bracket against the wall at your marked position and use a pencil to mark through each screw hole. This gives you exact drill targets.
- Double-check symmetry — before drilling anything, confirm both sides are at the same height using your level. Once you drill, you're committed.
- Drill pilot holes — use a drill bit slightly smaller than your screw diameter. Keep the drill perpendicular to the wall and go slowly. A pilot hole makes it much easier to drive screws straight.
- Insert wall anchors where needed — if you're not hitting a stud, tap plastic wall anchors into each pilot hole with a hammer until they're flush (sitting even) with the wall surface. Don't force them too deep.
If you're mounting brackets on the underside of the window frame itself, leave at least 1 inch of clearance from any corner or edge. Wood trim can split if you drill too close to the end grain.
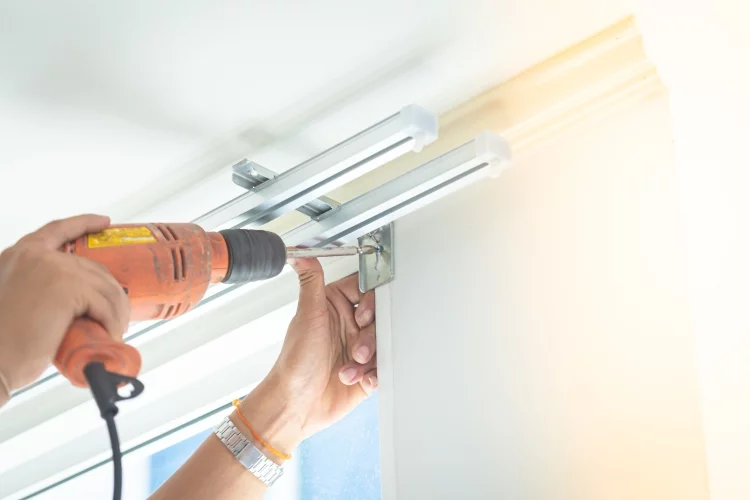
Step 3 — Mount Brackets and Assemble the Rod
- Screw the brackets into place — hand-tighten first to make sure the bracket sits flat against the wall, then use a screwdriver to snug everything up. Avoid overtightening, which can crack a drywall anchor or strip the screw head.
- Confirm level one more time — hold your level across both mounted brackets. If one is even slightly off, loosen it, adjust, and re-tighten before going further.
- Thread your curtain panels onto the rod — do this before setting the rod into the brackets. It sounds obvious, but this is a step many people skip and then regret. Threading panels with the rod already mounted overhead is awkward and risks knocking the rod out of place.
- Attach finials (the decorative end caps) — most twist on or click into place. Hand-tighten only; overtightening can crack decorative finials made of resin or ceramic.
Step 4 — Hang Your Curtains and Adjust
- Set the rod into the brackets — most brackets have a small locking screw or clip that secures the rod in place. Tighten this so the rod can't shift or roll out under the weight of the curtains.
- Slide the panels to check coverage — confirm that your curtains reach your target length (floor-length, apron-length, or sill-length) and that they fully cover the window width when closed.
- Adjust bracket height if needed — if the curtains are too short or too long by more than 2–3 inches, it's worth repositioning the brackets now rather than living with it indefinitely. Patch the old holes with spackling compound, let it dry, and re-drill at the corrected height.
- Step back and evaluate — look at the full window from across the room, not just up close. Confirm the rod looks level visually, the panels hang evenly, and the coverage suits your needs for both light control and privacy.
Tips for a Clean, Professional-Looking Result
Following the steps above gets the rod securely mounted. These additional tips push the result from "functional" to "looks like a professional did it."
Getting Height and Width Right
- Mount higher than instinct suggests — most people default to just above the window frame. Mounting 6–12 inches above, or even at ceiling height, makes the room feel taller and the window larger.
- Go wider than the window opening — extending brackets 4–6 inches on each side allows panels to stack completely off the glass when open. This keeps the full window exposed and maximizes natural light.
- Aim for floor-length panels — curtains that end 1/2 inch above the floor look crisp and intentional. A 1–2 inch "puddle" (where the fabric lightly pools on the floor) gives a more formal or romantic look. Both are valid — pick one and commit.
- Add a center support bracket for wide windows — any rod spanning more than 60 inches should have a third bracket in the center. Without it, even a sturdy metal rod will bow visibly under the weight of full-length curtains.
Common Mistakes to Avoid
- Skipping the level — a tilt that looks minor on its own becomes obvious once curtains are hanging. Always level before you drill.
- Mounting too close to the window frame — this leaves no room for curtain panels to stack off to the sides when open, blocking part of the glass permanently.
- Choosing a rod that's too thin for the curtain weight — match the rod's diameter (gauge) to the weight of your curtains. Lightweight rods rated for sheers will visibly bend under heavy blackout panels.
- Not using wall anchors on drywall — screws alone in drywall will slowly pull out over time under constant downward load. Always use rated anchors unless you're drilling directly into a stud.
- Threading panels after mounting — threading curtain rings or grommets onto a rod that's already mounted overhead is awkward, slow, and risks bumping the rod loose. Thread first, always.
These same principles — measure carefully, secure properly, don't cut corners — apply across home improvement and security projects alike. If you're tackling an outdoor security upgrade next, our guide on how to install an electric security fence walks through a similar measure-twice-drill-once approach for a larger-scale installation.
Keeping Your Curtain Rods Looking and Working Great
Once your rods are in place, a small amount of regular attention keeps them secure, clean, and looking good. The most common cause of bracket failure isn't a bad initial installation — it's gradual loosening that goes unnoticed until the rod pulls out of the wall.
Routine Checks
- Check bracket screws every six months — heavy curtains create constant downward pressure on the bracket. Screws can work loose gradually over months. A quick quarter-turn with a screwdriver keeps everything tight and prevents wall damage.
- Look for signs of stress around brackets — cracks in the drywall, gaps around the bracket base, or paint bubbling near the screws are early signs that an anchor is loosening. Catching it early means a simple tightening fix; catching it late means a bigger repair job.
- Check for rod sag — a noticeably bowing rod means you need either a center support bracket or a heavier-gauge rod. Don't let it sag long-term; it puts lateral stress on both end brackets.
- Test finials periodically — decorative end caps can loosen and fall over time, especially on rods that get adjusted frequently. Give them a gentle twist every few months and re-tighten or re-glue as needed.
Cleaning and Care Tips
- Wipe metal rods with a damp cloth — avoid abrasive scrubbers or harsh chemical cleaners that scratch finishes. A small drop of dish soap in warm water handles most dust and grime effectively.
- Dry the rod immediately after wiping — water left standing on metal rods — especially decorative iron, bronze, or brass finishes — leads to rust spots or tarnishing over time. One dry pass with a clean cloth prevents it.
- Use a microfiber cloth on wooden rods — wood finishes scratch easily. Dry dusting is usually sufficient. Avoid wet cleaning unless there's visible grime, and never soak wood hardware.
- Don't overlook the brackets — dust accumulates in bracket crevices and makes even a well-maintained rod look dull. A dry brush or a quick burst of compressed air clears bracket hardware quickly.
- Never hang wet or damp curtains — laundering curtains and re-hanging them while still damp significantly increases their weight. That extra load stresses both the rod and the wall anchors. Let panels fully dry first.
Curtain Rod Types at a Glance
Not all curtain rods work the same way. The type you choose affects how your curtains hang, how straightforward the installation is, and how long the hardware holds up. Here's a side-by-side look at the most common options.
| Rod Type | Best For | Pros | Cons | Typical Price Range |
|---|---|---|---|---|
| Tension Rod | Lightweight sheers, rentals, no-drill setups | No drilling required; fully repositionable | Can slip under load; not suitable for heavy drapes | $5–$30 |
| Standard Single Rod | Most bedrooms and living rooms | Versatile; available in wide size range; straightforward install | Supports only one layer of fabric | $15–$80 |
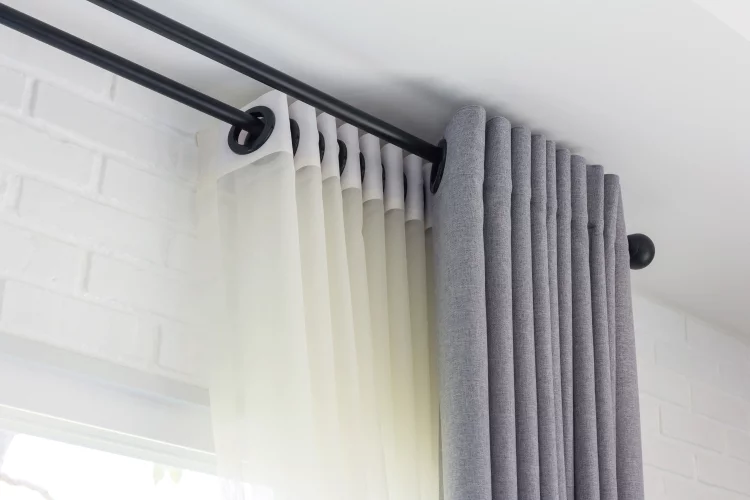
| Double Rod | Layering sheer panels with blackout curtains | Two fabric layers from one bracket set; great for light control | Heavier overall; requires stronger wall anchoring | $25–$120 |
| Traverse Rod | Large windows; formal dining and living rooms | Opens and closes via pull cord; handles wide spans well | More complex installation; higher cost | $40–$200 |
| Café Rod | Kitchen windows; half-window privacy | Small and lightweight; easy to install anywhere on the frame | Only covers the lower portion of the window | $10–$50 |
| Decorative Rod | Formal spaces; design-forward rooms | Wide variety of finishes and finial styles; high visual impact | Heavier; higher cost; requires more careful installation | $30–$250+ |
For most homes, a standard single rod covers everyday needs well. If privacy and light control are a priority — which they often are from a home security perspective — a double rod is worth the extra cost. It lets you keep a sheer panel in place for daytime natural light while a blackout panel closes at night to block sightlines completely.
Final Thoughts
Installing curtain rods is one of the most accessible home improvement projects you can take on yourself — and one of the most satisfying to finish. With the right tools, careful measuring, and the tips in this guide, you can have a clean, level, professional-looking result done in a single afternoon. Pick up your supplies, choose the rod type that fits your window and curtain weight, and give it a try this weekend — you'll likely be surprised at how straightforward the whole process really is.


About Robert Fox
Robert Fox spent ten years teaching self-defence in Miami before transitioning into home security consulting and writing — a background that gives him an unusually practical, threat-aware perspective on residential security. His experience spans physical security assessment, lock and alarm system evaluation, and the behavioral habits that make homes harder targets. At YourHomeSecurityWatch, he covers home security product reviews, background check and criminal records resources, and practical guides on protecting your property and family.
You can Get FREE Gifts. Furthermore, Free Items here. Disable Ad Blocker to receive them all.
Once done, hit anything below