Yes, you can install window blinds yourself in under an hour with basic tools — no contractor required. Knowing how to install window blinds is one of the most practical home improvements you can make, and it pays off immediately in privacy, light control, and security. For more tips and product recommendations, explore our complete window blinds guides.
From a home security perspective, bare windows are a bigger problem than most homeowners realize. They give passersby a clear view of your valuables, your daily routines, and whether anyone is home. Properly installed window blinds close that visibility gap without sacrificing natural light when you want it. They're one of the simplest passive security upgrades you can make to your home.
This guide walks you through the entire process: when to go DIY versus call a professional, how to measure and buy the right blinds, a step-by-step installation walkthrough, a realistic cost breakdown, and fixes for the most common problems. Whether this is your first install or your tenth, you'll come away with tighter, cleaner results.
Contents
- When It Makes Sense to Install Window Blinds Yourself
- The Pros and Cons of DIY Blind Installation
- How to Install Window Blinds: Step-by-Step
- What Window Blinds Actually Cost
- Best Practices for a Professional-Looking Install
- How to Fix Common Window Blind Problems
- Frequently Asked Questions
- Next Steps
When It Makes Sense to Install Window Blinds Yourself
Not every window blind installation calls for a professional. Most of the time, a confident DIYer with basic tools can get the job done faster and cheaper than waiting on a booking. But there are situations where the math changes — and knowing the difference upfront saves you a frustrating afternoon.
Good Candidates for a DIY Install
You're a strong candidate for a DIY window blind installation if any of the following describe your situation:
- You're installing standard-sized blinds (under 72 inches wide) in a typical rectangular window
- Your windows are at a comfortable working height — no second-story skylights or awkward angles
- You're comfortable using a power drill and reading a tape measure accurately
- Your window frames are made of wood, drywall, or vinyl — all common materials that hold screws reliably
- You're planning an inside-mount install and your window frame has at least 1.5 inches of flat mounting depth
- The blinds are lightweight to medium weight — aluminum, faux wood, or roller shades
If those points describe your project, DIY is the right call. Standard horizontal blinds and roller shades are particularly beginner-friendly — the bracket systems snap into place with minimal fuss, and most manufacturers include clear paper instructions in the box.
When You Should Hire a Professional
Skip the DIY approach in these situations:
- You're installing motorized or smart blinds that require electrical or smart home wiring
- Your windows are unusually large — floor-to-ceiling, panoramic, or custom-shaped
- You're mounting into a masonry or plaster wall where standard screws won't hold without specialty anchors
- You need precision blackout coverage for a home theater, nursery, or shift-worker's bedroom
- You're working on second-floor exterior windows that require an extension ladder and a second person
- You're installing very heavy real-wood blinds that need reinforced bracket hardware
Motorized and smart blinds specifically benefit from professional setup. Incorrect wiring can cause electrical shorts or void the product warranty — and those warranties are worth protecting given the cost of motorized systems.
The Pros and Cons of DIY Blind Installation
Before you commit, look at the complete picture. DIY has genuine advantages — but it also comes with trade-offs that affect the quality of your finished result.
The Real Advantages
- Significant cost savings: Professional installation typically runs $75–$150 per window. Do it yourself and that cost disappears entirely.
- Full scheduling control: You work on your timeline, not a contractor's two-week booking window.
- Skill that compounds: Once you've installed one window correctly, every subsequent install gets faster and cleaner. By window five, you'll be moving at near-professional speed.
- Immediate privacy and security: You don't wait days for an appointment. Your home is covered the same day you purchase.
- On-the-spot adjustments: If something looks off, you can fix it right then rather than filing a service complaint and waiting for a callback.
The Honest Drawbacks
- Off-center or misaligned bracket holes are difficult to fully conceal once drilled
- Measurement errors mean returning the blinds and re-ordering, which adds days to the project — and most custom-cut blinds are non-returnable
- Heavy or wide blinds require a second person to hold the headrail while you secure the brackets
- There is no labor warranty — if a bracket pulls out or the mechanism fails from a bad install, the repair falls on you
- First-timers underestimate how much prep time matters: rushing the marking and leveling stage causes most DIY problems
| Factor | DIY Install | Professional Install |
|---|---|---|
| Labor cost | $0 | $75–$150 per window |
| Time per window | 30–90 minutes | 15–30 minutes (experienced) |
| Tools required | Drill, level, tape measure, pencil | Provided by installer |
| Result quality | Good to excellent (with proper prep) | Excellent |
| Labor warranty | None | Typically 1 year |
| Scheduling flexibility | Immediate | Days to weeks out |
| Best for | Standard windows, budget-conscious installs | Motorized, oversized, or complex setups |
How to Install Window Blinds: Step-by-Step
Follow these steps in order and you'll avoid the most common mistakes homeowners make on their first blind installation. Take your time on the measuring and marking steps — that's where the quality of your finished result is actually determined.
Tools and Materials You Need
Gather everything before you start. Mid-install tool searches break your focus and lead to errors.
- Tape measure (metal, rigid — fabric tape stretches)
- Pencil
- 2-foot bubble level or self-leveling laser level
- Power drill with Phillips and flathead bits
- Drill bit slightly smaller than your screw diameter (for pilot holes)
- Wall anchors (for drywall mounting without studs)
- Step stool or ladder
- The blinds themselves plus all included mounting hardware
Read the manufacturer's instruction sheet before you open the hardware bag. Bracket placement and headrail attachment vary significantly by brand — what works for one brand may not apply to another.
Step 1: Measure Your Window Correctly
Measuring is the single most important step in the entire process. A wrong measurement means the blinds won't fit, will leave light gaps, or must be returned. Take your time.
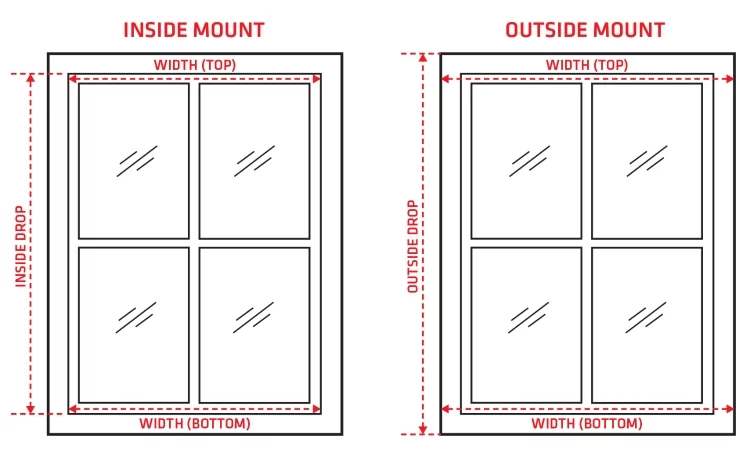
For an inside mount (blind sits inside the window frame, recessed look):
- Measure the width at the top, middle, and bottom of the window opening
- Use the narrowest of the three measurements — this is your blind width
- Measure the height from the top of the opening straight down to the window sill
- Order to that exact size — reputable manufacturers automatically deduct a small clearance so the blind fits inside the frame without binding
For an outside mount (blind covers the frame and extends onto the wall):
- Add at least 2 inches to each side of the window opening to block side light
- Plan to mount 3 inches above the top of the window frame so the headrail doesn't block the glass
- Measure the full drop from your intended top mounting point to just below the sill
- Order those expanded dimensions — the blind should cover the frame entirely
Pro tip: Always measure twice before ordering. Most custom-cut blinds are non-returnable — a single measurement error means re-ordering from scratch and waiting for a new shipment.
Step 2: Choose and Buy the Right Blinds

With your measurements in hand, choose a blind type that matches your room's function and your privacy requirements. Here's how the main types compare:
- Horizontal aluminum blinds: Most affordable, easy to clean, adjustable light control — ideal for kitchens, offices, and bathrooms
- Faux wood blinds: More durable than real wood in humid rooms, cleaner look than aluminum — good all-purpose choice
- Roller shades: Minimalist profile, easy single-bracket install, excellent for bedrooms when combined with a blackout fabric
- Cellular (honeycomb) shades: Best insulation value, good for energy savings — slightly more involved to mount correctly
- Vertical blinds: Designed for wide horizontal openings like sliding glass doors and patio windows
- Roman shades: Decorative fabric option, more complex installation — not ideal for a first-timer
For security-focused rooms, choose blinds that close completely with no visible light gaps at the sides or bottom. Blackout roller shades and cellular shades are the strongest options when you don't want silhouettes visible from outside. If you're also adding fabric panels for layered coverage, our guide on how to install curtain rods walks you through adding a second layer of privacy alongside your blinds.
Step 3: Mount the Brackets and Hang the Blinds
This is where everything comes together. Work through these steps without skipping the leveling check — it's the one step that separates clean professional results from a crooked install you'll notice every day.
- Mark your bracket positions: Hold the first bracket against the mounting surface at the correct location. Use a pencil to mark each screw hole. Repeat for all brackets.
- Level across all marks: Before drilling anything, hold your level across all pencil marks simultaneously. Adjust until every mark sits on the same horizontal plane. This is non-negotiable.
- Pre-drill pilot holes: For hardwood frames, drill a pilot hole slightly narrower than the screw diameter to prevent splitting. For drywall without a stud behind it, insert plastic wall anchors before driving the screws.
- Drive the bracket screws: Tighten firmly but stop before you strip the screw head. Overtightened screws in wood frames are much harder to fix than slightly snug ones.
- Snap the headrail into the brackets: The headrail (the aluminum top bar of the blind) clicks into position. You'll feel or hear a definite snap when it's fully seated. If it feels loose, the bracket isn't fully closed — press harder or check the locking tab.
- Clip on the valance: The decorative front cover snaps onto the headrail clips to conceal the brackets and hardware. Press firmly at each clip point until it seats flat.
- Test the full mechanism: Raise and lower the blind through its complete range. Tilt the slats in both directions. If anything binds or sticks, remove the headrail from the brackets and confirm it's fully seated before reinstalling.
If you have security cameras positioned near ground-floor windows, think carefully about how your blind placement affects their coverage angles. Our detailed breakdown of the best locations for home security cameras covers how to coordinate window treatments with camera sightlines so neither system undermines the other.
What Window Blinds Actually Cost
Your total project cost depends on the blind type, window size, and whether you buy stock or custom. Here's a realistic breakdown based on current retail pricing.
Blind Prices by Type
- Basic aluminum horizontal blinds: $10–$35 per window
- Faux wood blinds: $25–$80 per window
- Roller shades (light filtering): $20–$70 per window
- Roller shades (blackout): $35–$100 per window
- Cellular / honeycomb shades: $40–$150 per window
- Real wood blinds: $80–$200+ per window
- Motorized smart blinds: $150–$500+ per window
For a typical three-bedroom home with 10 windows, expect to spend $150–$600 on budget blinds or $800–$2,000+ on mid-range options. Big box stores like Home Depot and Lowe's offer free in-store custom-cut services on many standard blind lines at no added charge — bring your measurements and they cut on the spot.
DIY vs. Professional Installation Costs
Professional blind installation typically runs $75–$150 per window, plus a trip or service charge that ranges from $50–$100. For a 10-window home, that's a potential $800–$1,600 in labor alone — on top of the blind cost itself.
DIY eliminates the labor cost entirely. The tools you need — a drill, level, and tape measure — total around $60–$100 if you don't already own them, and they're reusable for every future home project. Even factoring in tool cost, most homeowners save $500 or more by doing the install themselves.
The one scenario where professional cost is justified: motorized systems. A poorly wired motorized blind can short out the motor, void the product warranty, or create a fire hazard in rare cases. For anything with wiring, pay the professional fee.
Best Practices for a Professional-Looking Install
The gap between a sloppy blind install and a clean one comes down to a few consistent habits. These are the same practices professional installers follow on every job — regardless of how simple the project looks.
Inside vs. Outside Mount: Choose Before You Order
Your mount type determines how you measure, and you cannot change your mind after the blinds are cut to size. Make this decision first, before you place any order.
- Inside mount: Use when your window has a clean, deep frame with at least 1.5 inches of flat mounting surface. Gives a built-in, architectural look that sits flush with the wall. Best for decorative or modern interiors.
- Outside mount: Use when your frame is shallow, your window is small, or you want to maximize blackout coverage. Also makes windows appear taller and wider — a useful visual trick in smaller rooms.
When in doubt, go with outside mount. It forgives minor measurement imprecision and blocks more light — which matters most in bedrooms and any room where you prioritize privacy after dark.
Tips for a Cleaner, More Secure Finish
- Use a self-leveling laser level for windows wider than 36 inches — it projects a perfectly horizontal line across the entire width, eliminating the guesswork that causes crooked installs
- For any blind wider than 48 inches, install a center support bracket to prevent the headrail from sagging in the middle over time
- Wrap a strip of painter's tape around your drill bit at the correct depth so you don't drill too far into the frame or through drywall
- Wipe the mounting surface clean and dry before attaching brackets — dust and debris allow brackets to shift gradually over months of use
- Keep all original packaging and extra hardware for at least two weeks after install — if you need to exchange the blinds, having the original box speeds up the return significantly
- For homes with children, use cordless blinds or mount a cord cleat hook well above reach height — according to documented safety data on window blinds, dangling cords are a strangulation hazard for children under six
- After install, test the blind in full darkness to check for light gaps at the sides and top — gaps you miss in daylight become obvious at night when interior lights are on
How to Fix Common Window Blind Problems
Even careful installs run into issues. Most problems have a straightforward fix that takes less time to resolve than you'd expect. Here's how to handle the ones you're most likely to encounter.
Blinds That Won't Stay Up
If your blinds drop back down when you raise them, the problem is almost always a worn or misengaged cord lock inside the headrail:
- Pull the cord down at a slight angle toward the nearest side of the blind — this is the motion that engages the internal locking mechanism
- If pulling at an angle doesn't help, the cord lock mechanism itself is worn. Replacement cord locks cost $5–$15 at any hardware store and install in under 10 minutes with a screwdriver
- For cellular shades specifically, check that the bottom rail is seated evenly side to side — an uneven bottom rail puts uneven tension on the lift cords and prevents them from locking
Uneven or Crooked Blinds
Crooked blinds almost always come back to unlevel brackets from the initial install. Here's the fix:
- Remove the blind from the brackets by pressing the release tab on each bracket
- Check each bracket independently with your level — identify which one is off
- Loosen the screws on the low bracket slightly, use the level to find the correct position, then retighten
- If the screw holes are stripped and won't hold, insert a toothpick dipped in wood glue into the hole, let it cure for two hours, then re-drill and re-drive the screw
- Rehang the blind and check across both brackets with your level before calling it done
Cord and Mechanism Issues
- Cord is tangled: Lower the blind to its full open position, then gently separate each cord strand by hand. Never pull hard on a tangled cord — it worsens the tangle and can damage the internal pulley.
- Slats won't tilt: The tilt wand may have popped out of the tilt mechanism socket. Reinsert it by aligning the square peg on the wand's connector with the square socket in the headrail and pressing firmly until it seats.
- One side won't raise: A lift cord has likely slipped off its pulley wheel. Remove the headrail from the brackets, locate the displaced cord inside the headrail channel, re-thread it around the pulley, and reinstall.
- Valance falls off repeatedly: The plastic valance clips have worn out. Universal replacement valance clips are available at home improvement stores for under $5 per pack and snap on in seconds.
- Blind won't lower past a certain point: A cord has knotted inside the headrail. Detach the headrail, open the end cap, and work the knot free by hand before reassembling.
Frequently Asked Questions
How long does it take to install window blinds?
Most standard window blind installations take 20–45 minutes per window once you have your measurements and all materials ready. Your very first install may run up to an hour as you get familiar with the bracket system and headrail mechanism. By the third or fourth window, your pace improves dramatically — most homeowners complete subsequent windows in 20 minutes or less.
Do I need a power drill to install window blinds?
For the majority of installs, yes — a power drill makes bracket mounting faster and produces more consistent results than a manual screwdriver. A screwdriver works in very soft wood frames, but it's slow and harder on your hands. If you're doing more than two windows, a basic cordless drill is worth the investment. It will be used on dozens of future projects beyond this one.
Can I install window blinds without making holes in the wall?
Yes, in limited situations. Tension-mounted blinds use spring pressure to hold in place inside a window frame with no drilling required — they work well for small, lightweight blinds in shallow frames. Adhesive-mount options designed for renters are also available. However, both no-drill methods are limited to lighter blind types. Heavy faux wood, cellular shades, or wide blinds require drilled brackets to hold safely over time.
What is the difference between inside mount and outside mount blinds?
An inside mount positions the blind inside the window frame, recessed behind the wall surface — it gives a clean, built-in architectural look but requires at least 1.5 inches of flat mounting depth in the frame. An outside mount attaches the blind to the wall above and around the window opening, covering the frame entirely. Outside mounts block more light, make windows appear larger, and are more forgiving of minor measurement variations. If your window frame is shallow or you need maximum blackout coverage, outside mount is the better choice.
Next Steps
- Measure every window you plan to cover this week — write down width and height for each opening, and note whether your frame has enough depth for an inside mount (minimum 1.5 inches of flat mounting surface).
- Choose your blind type based on room function — blackout roller shades or cellular shades for bedrooms, faux wood or aluminum for kitchens and bathrooms, vertical blinds for any sliding patio door.
- Order your blinds with confirmed measurements — add 2 inches per side for outside mounts, order exact dimensions for inside mounts, and double-check the minimum depth requirement before placing a custom order.
- Gather your tools before the blinds arrive — power drill, appropriate drill bits, a 2-foot level, tape measure, pencil, and wall anchors if you're mounting into drywall without a stud behind the bracket location.
- Start with your most visible or most-used room — getting your technique right on the main living area or master bedroom first gives you a polished result where it matters most, and the skills carry over to every window that follows.


About Robert Fox
Robert Fox spent ten years teaching self-defence in Miami before transitioning into home security consulting and writing — a background that gives him an unusually practical, threat-aware perspective on residential security. His experience spans physical security assessment, lock and alarm system evaluation, and the behavioral habits that make homes harder targets. At YourHomeSecurityWatch, he covers home security product reviews, background check and criminal records resources, and practical guides on protecting your property and family.
You can Get FREE Gifts. Furthermore, Free Items here. Disable Ad Blocker to receive them all.
Once done, hit anything below